Showing posts with label crafts. Show all posts

Tuesday, 25 May 2010

Children's Craft Showcase - Fathers Day Cards and Presents

Fathers day will soon be upon us, it is Sunday 20th June this year and I have been busy thinking about cards and gifts for MadDad.  If you are anything like me then you would prefer to give a home made card every time.

I have a couple of very simple ideas for you.
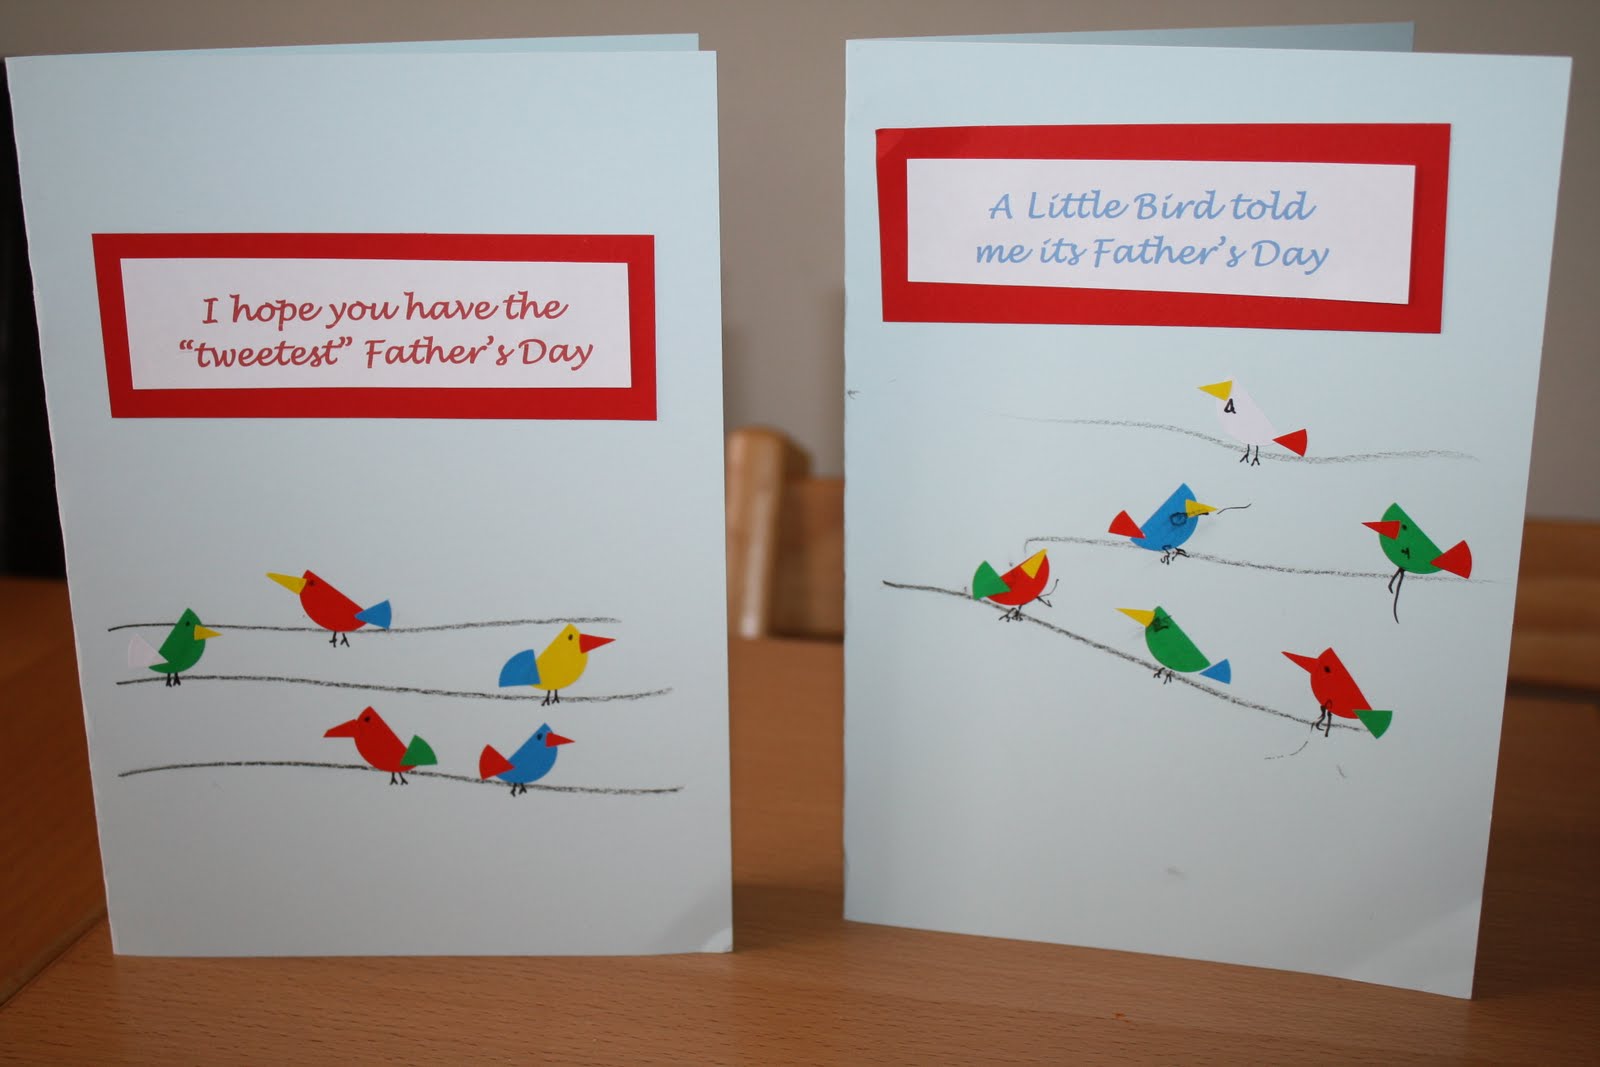

I was inspired by Valerie at Frugal Family Fun Blog for this card.

Materials

Card stock
pencil or pen
circle stickers, various colours
scissors

Method

Initially fold your card stock in half to to create a greeting card shape

Draw a number of lines horizontally across the card to make the wire for the birds to sit on.

Depending on the age of your child, you can either cut the stickers for them or help them.

You use half a sticker (semi-circle) for the birds body, a sixth of the sticker to make the tail feathers and an eight of the circle to make the birds beak.

Using either a pencil or a fine liner add some feet and eyes for the birds

It is really easy, simple, very effective and then all that is left is to add your cheesy bird quotes

Next up is a twist on our favourite chick cards, we have done this for my niece who is 5 this week.


Materials

Card stock
Paper
Scissors
feathers
Googlie eyes
Glue

Method

Again very simple, Mini cut out two bird shapes (semi circle) and stuck them to the folded card stock.


We used two triangles cut out of foam for their beaks and a feather for the tails.  He also used foam shapes to add an age and name on to the card.

Scrap Art Book Marks

This is a super way of using up and making purposeful bits of art that the children have done.  For ours I used our Mable Paintings.


Materials

Card
Scissors or paper cutter
Scrap Artwork
Paper
Glue
Laminator or clear sticky backed plastic (also know as contact paper)


Method


Cut and matt the scrap artwork and your choice or card, making sure that the artwork is slightly smaller than the card backing and glue on.


We made a back for the bookmark out of paper, which read Happy Father's Day 2009 and then mini decorated it and stuck it on to the rear of the bookmark.


I then laminated them, I got four in to one pouch leaving space for the sheet to adhere between the bookmarks.  If you don't have a laminator (mine was £5 from Tesco), then you can use clear sticky backed plastic or contact paper.


I then used my guillotine to cut them up to individual double sided book marks.
-------------------------------------------

I hope I have inspired you to get crafting for Father's day this year  and if you do, I would love for you to come back and link here, so that we can all see and maybe have a try of your ideas too.

 0 entries so far... you're next!

    1. You are next...
      Click here to enter


    Share/Save/Bookmark

    Wednesday, 24 February 2010

    Children's Craft Showcase - Masking Tape


    This one goes out to all of you with little ones, ones that scribble and just love free art.

    Materials

    Paper
    Masking tape, as low tack as possible
    crayons, pens, pencils, glitter, paint


    I know that I keep going on about not passing your perfectionism on to your children and letting them express themselves, but it is so true.  I also know that there are lots of people out there who don't craft with their children because they fear the mess, well this is one for you.


    By using masking tape, you can tape the paper on to the table, which is great for smaller children and stopped the paper moving.


    You can also use different width tape, as the aim is to create a border of blank paper around the drawing.


    Mini loves scribbling or making the paper colourful and this is a great way of letting him express himself.  I have also used this method with stamping and fabric printing.


    So if you are inspired to do any crafty things with your children over the next couple of weeks then please link to me with the McLinky as I look to look at the things you all make and do.


    Future Projects

    We are going to be doing some Easter projects so please keep some egg shells for out next showcase!

    Share/Save/Bookmark

    Monday, 18 January 2010

    Childrens Craft Showcase - Home Made Scented Playdough


    Lets start the year with an oldie but a goodie and this is something that you can take out when you are lacking in motivation or just need a little break.  Once you have made it you will never again buy it and trust me adding essential oils makes it so nice.

    Materials/Ingredients

    1 and half cups (1 cup is 250ml) of salt
    3 cups of warm water
    3 cups of plain flour
    3 tablespoons of oil
    6 teaspoons of cream of tartar
    Food colouring
    Essential oils, I use lavender, neroli, geranium, camomile
    Air tight containers

    Method


    1. add the salt and water to a large pan and wait for the salt to melt


    2. add the flour, oil and cream of tartar and heat over a medium heat, stirring continuously until it starts to pull away from the sides
    3. Tip out the dough and need for about 2 mins
    4. Split the dough in to smaller amounts and add food colouring and essential oil
    Now we add different smells to the colours, being anal like I am, we have lavender in the blue, etc, etc


    Now, I know there are other recipes out there, but this one seems to last better, sometimes up to six months, but then I have children, who like to keep the colours separate (yes strange I know)!

    Play dough is not the devil's play toy, I know some people don't like it but I have never understood why.  If you have carpet then pop down a plastic tablecloth under the table.


    We have a large box of toys to use with it, that have been collected over the years, but the ones that they always come back to, are the rolling pins and cookie cutters.  I just buy inexpensive plastic seasonal ones and use them for both the play dough and the cookies!

    If I have inspired you to make any playdough, or just to craft with your children, then please come back and add your link below.  Lets make 2010 the year that we become a little less worried about the mess crafting with children can create and the need to add our perfectionism to the mix and make it the year for fun crafting.

    Oh and please, please, please add my button to your sidebar and lets get more children and parents crafting too.  Thank you


    Lastly this is your showcase too, if there is anything you would like me to focus on I will.  The plan is to try and keep things seasonal, easy and all encompassing.  Enjoy

    Share/Save/Bookmark

    Monday, 16 November 2009

    Easy Christmas Cards for Children


    I think that Christmas cards that the children have made are a lovely thing to give, but often they can be messy, difficult, time consuming and complicated to make.  Not these.


    Firstly you need:

    Card
    Masking tape
    Green Paint
    Sponges
    Glue
    Sequins or stars
    Glitter


    You start by cutting a tree shaped template in a piece of card.  The easiest way to do this is fold it in half.  You can make it as simple or fancy as you like.  I am simple lady myself.


    Stick the template on to your card.  I also stick the card down to the table for minimad.


    You can either use a sponge or just finger paint in the stencil (sponges are so much easier with small ones)


    Watch out it can get messy - Mine wear the art smocks I made from MadDads old work shirts


    Allow the cards to dry - MiniMad got a bit bored by this point and MaxiMad finished them off.


    Decorate your trees


    We used sequins, small stars and glitter


    Glitter is always a favorite here


    MaxiMad looking proud of his work


    The finished articles, we tend to do them all shapes and sizes and do a few each week on the lead up to Christmas.

    The deal is, if I have inspired you you do something similar with your chilren, then please add it to the McLinky Below.

    Friday, 23 October 2009

    Salt Dough Halloween Decorations


    We love salt dough here in TheMadHouse.  It is an inexpensive and fun way of making and modeling.  I picked up a set of cookie cutters from tesco for 99p.  They are small, but they are fine until we fine some larger ones and have a few spare pennies.

    Basic recipe

    2 cups of plain flour
    1 cup of salt
    1 cup of warm water

    I also add 1 tablespoon of lemon juice to make the final decoration harder.

    Mix the flour, salt and lemon juice adding water until you get a firm dough. Then knead the dough.  The more you kneed the more pliable the dough will become.

    We basically roll out the dough and cut out our decorations with a cookie cutter.  Then use a straw to cut out a hole for ribbon.

    We cook our dough at the lowest oven temperature for 3 hours, then leave overnight before we paint and decorate them.


    I dont have any pictures of the actual rolling, cutting and painting process, as I had my hands full with the MiniMads!!

    But here is what we have done with them.  We have made single decorations for the fairy twigs.


    We had lots of fun sticking on little sequins, which were actually table confetti from the pound shop.


    The rest of them had holes that were far too small to thread with the garden twine, so we just popped them on the dresser.  Kind of like a little Halloween display.


    When I collected MiniMad from Preschool yesterday afternoon, one of his teachers told me that he was going to make her a badge to go with the stickers she already had.  So we used one of the decorations and added some ribbons from my stash and then popped a safety pin through the ribbon.


    Just a little something from MiniMad.


    Thursday, 15 October 2009

    Boo - our Halloween ghosts


    You will have gathered by now that I like simple ideas, often the simpler the better and you dont get much more similar than ghostie paper chains.


    The only prep work required by me was to fold the roll of paper (ikea) and cut out the ghosts (I didn't even need a template - smug).  I then drew the eyes and mouth on one and maximad did the rest.  Voila, effective, simple, inexpensive and family inclusive halloween decorations.  I saw this originally on Skip to my loo and she has templates there if you need them too.

    Keep an eye open for more easy and simple Halloween crafts you can do with children.


    Tuesday, 13 October 2009

    Autumn Art with PlayMais


    MaxiMad and Mad dad have loved exploring the playmais and decided to do some autumn cards with them to test out their ability to stick to paper and card.


    MaxiMad decided on an autumn tree


    and a bonfire


    He used chalk to colour in the sky and added a moon and stars


    Aren't they just fantastic..... Yes the cards are too (dont you just love the little hedgehogs under the tree).

    Saturday, 10 October 2009

    Finger Knitting

    Me and MaxiMad had a go at finger knitting last night in bed.  It is something I had forgotten I even knew how to do!!!


    So why the finger knitting I hear you ask, well it is getting cold oop North and I have dug out the hats, scarfs and gloves out of storage, but I can only find one boy glove.  They were forever losing then last year.  So I have been and purchased some gloves (2 pair for a pound from PoundLand) and I have used the finger knitting to make a string to put through the arms of their coats.


    Yes this is so 1970's, but I saves on gloves, we have the wool and I had fun with MaxiMad.  MadDad is not at all happy, he hated having his gloves on elastic!


    Related Posts with Thumbnails